|
|
| (7 intermediate revisions by 2 users not shown) |
| Line 1: |
Line 1: |
|
{{Translations|View this page in|Article=Tileset_handbook}} |
|
{{Translations|View this page in|Article=Tileset_handbook}} |
|
|
|
|
|
This page wants to be a handbook for people who want to create or find a tileset for Globulation2. For now it's only a start. |
|
This page wants to be a general handbook for people who want to create or find a tileset for Globulation2. |
|
|
|
|
|
|
|
|
=Tileset download= |
|
=Tileset download= |
|
|
Here some spare new aspect fore parts of tileset. You need only to download the .tar.gz archivie and untar tiles in the '''data/gfx''' folder. Be sure of having a backup of the original ones! |
|
Still no tileset for now, but first will arrive soon... |
|
|
|
|
|
|
[[Image:trees-middle_europe.png]] |
|
|
[http://federicomassi.altervista.org/_altervista_ht/trees-middle_europe.tar.gz Click here to download an alternative aspect for trees] by [[User:Shew|Shew]]. |
|
|
|
|
|
[[Image:wheat-cartoon.png]] |
|
|
[http://federicomassi.altervista.org/_altervista_ht/wheat-cartoon.tar.gz Click here to download an alternative aspect for trees] by [[User:Shew|Shew]]. |
|
|
|
|
|
|
|
|
|
|
|
=Tiles list= |
|
=Tiles list= |
|
Tiles are placed in '''\data\gfx''' directory. They are... |
|
Tiles and other graphics are placed in '''\data\gfx''' and in '''\data\gui''' directory. They are... |
|
|
*''"<b style="color:red">Building_name</b><b style="color:green">Level</b><b style="color:purple">Status</b>.png"'' for the buildings. |
|
*''barracks0b0.png'' for the level 1 barracks (''barracks0b0'''r'''.png'' is the tile that blend on ''barracks0b0.png'' the team color); |
|
|
*''barracks1b0.png'' for the level 2 barracks (as for the previous one); |
|
|
*''barracks2b0.png'' for the level 3 barracks (...); |
|
|
|
|
|
|
|
<b style="color:red">Building_name</b>: should be ''barracks'', ''defencetower'', ''hosp''ital, ''inn'', ''market'', ''pool'', ''racetrack'', ''school'', ''swarm''; the stone wall works in a different way); |
| ⚫ |
*''black'''X'''.png'' ('''X''' from 0 to 15); |
|
|
|
|
|
|
|
<b style="color:green">Level</b>: indicates the level of the building shown in the tile (<b style="color:green">Level</b> = game level-1, so a level 1 school has a <b style="color:green">Level</b> value of 0); |
| ⚫ |
*'' brush'''X'''.png'' ('''X''' from 0 to 9); |
|
|
|
|
|
|
|
<b style="color:purple">Status</b>: indicates status of building (<b style="color:purple">Status</b> = ''B0'' means ''built'', ''B1'' means ''built and damaged'', ''B2'' means ''built and seriously damaged'', ''C0'' means ''under construction''); |
| ⚫ |
*'' buildingsite'''X'''.png'' ('''X''' from 0 to 5); |
|
|
|
|
|
|
|
NOTE: After <b style="color:purple">Status</b> you could find a '''''r''''' that means that this is a overlay tile that colours the tile with same name lacking of final '''''r''''' with the team color; |
| ⚫ |
*'' bullet'''X'''.png'' ('''X''' from 0 to 1); |
|
|
|
|
|
|
⚫ |
*'' "black'''X'''.png "'' ('''X''' from 0 to 15); |
|
*''clearingflag0r.png'' |
|
|
|
|
|
|
*''cloud0.png''; |
|
*''"brush'''X'''.png"'' ('''X''' from 0 to 9); |
|
|
|
|
|
*''death'''X'''r.png'' ('''X''' from 0 to 9); |
|
*''"buildingsite'''X'''.png"'' ('''X''' from 0 to 5); |
|
|
|
|
|
*''defencetower0b0.png'' |
|
*''"bullet'''X'''.png"'' ('''X''' from 0 to 1); |
|
*''defencetower1b0.png'' |
|
|
*''defencetower1b1.png'' |
|
|
*''defencetower1b2.png'' |
|
|
*''defencetower2b0.png'' |
|
|
|
|
|
|
*''explorationflag0r.png'' |
|
*''"clearingflag0r.png"'' |
| ⚫ |
*''explosion'''X'''.png'' 0-5 |
|
|
|
|
|
|
|
*''"cloud0.png"''; |
|
*(Continue soon...) |
|
|
|
|
|
⚫ |
*'' "death'''X''' r.png "'' ('''X''' from 0 to 9); |
|
|
|
|
|
*''"explorationflag0r.png"'' |
|
⚫ |
*'' "explosion'''X'''.png "'' 0-5 |
|
|
|
|
⚫ |
*'' "gamegui'''X'''.png "'' ('''X''' from 0 to 27); |
|
|
|
|
|
*''"image.png"'' |
|
|
|
|
|
*''"IntroMN.png"'' |
|
|
|
|
|
*''"magiceffect0.png"'' and ''"magiceffect0r.png"'' |
|
|
|
|
|
*''"mini<b style="color:red">Building_name</b><b style="color:green">Level</b><b style="color:purple">Status</b>.png"'' with same notes you can see over; |
|
|
|
|
|
*''"out.png"''; |
|
|
|
|
|
*''"ressource'''X'''.png"'' ('''X''' from 0 to 64); (50-54: Cherry) |
|
|
*''"ressourcemini'''X'''.png"'' ('''X''' from 0 to 7); (0:Wood, 1: wheat, 5:cherry) |
|
|
|
|
|
*''"rotatingEarth'''X'''.png"'' ('''X''' from 0 to 19); |
|
|
*''"rotatingEarthi.png"''; |
|
|
|
|
⚫ |
*'' "shade'''X'''.png "'' ('''X''' from 0 to 20); |
|
|
|
|
|
*''"terrain'''X'''.png"'' ('''X''' from 0 to 271); |
|
|
|
|
|
*''"unit'''X'''.png"'' ('''X''' from 0 to 447) that are the "bodies" of the globs; |
|
|
*''"unit'''X'''r.png"'' ('''X''' from 64 to 447) that are the "shadows" of the globs; |
|
|
|
|
|
*''"unitmini'''X'''r.png"'' ('''X''' from 0 to 3); |
|
|
|
|
|
*''"wall'''X'''.png"'' ('''X''' from 0 to 15) show defensive wall; |
|
|
*''"wall'''X'''r.png"'' ('''X''' from 0 to 15) overlay team color over walls ; |
|
|
*''"wallc0.png"'' and ''"wallc0r.png"''; |
|
|
|
|
|
*''"warflag0r.png"''; |
|
|
*''"water0.png"'' and ''"water1.png"'' |
|
|
|
|
|
|
|
|
|
|
|
|
|
=Tiles HowTo= |
|
=Tiles HowTo= |
|
How to create tiles; blending near tile; software instruments; |
|
How to create tiles; blending near tile; |
|
|
|
|
|
=Software instruments= |
|
|
Good software for this purpose are [http://www.inkscape.org Inkscape] and [http://www.gimp.org/ the GIMP]; but if you are not very good with vector painting, GIMP is simpler for having hi-quality tiles. |
|
|
|
|
|
|
|
|
=Tileset examples= |
|
=Tileset examples= |
| Line 48: |
Line 91: |
|
image:Tiles_vector_tryout_cartoon_wheat.jpg|Result number 2 of attempt of creating a vector-based tileset by Shew |
|
image:Tiles_vector_tryout_cartoon_wheat.jpg|Result number 2 of attempt of creating a vector-based tileset by Shew |
|
</gallery> |
|
</gallery> |
|
|
|
|
|
[[Category:en]] |
|
|
[[Category:Contributor Resources]] |
This page wants to be a general handbook for people who want to create or find a tileset for Globulation2.
Tileset download
Here some spare new aspect fore parts of tileset. You need only to download the .tar.gz archivie and untar tiles in the data/gfx folder. Be sure of having a backup of the original ones!
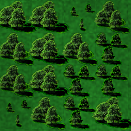
 Click here to download an alternative aspect for trees by Shew.
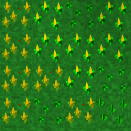
 Click here to download an alternative aspect for trees by Shew.
Tiles list
Tiles and other graphics are placed in \data\gfx and in \data\gui directory. They are...
- "Building_nameLevelStatus.png" for the buildings.
Building_name: should be barracks, defencetower, hospital, inn, market, pool, racetrack, school, swarm; the stone wall works in a different way);
Level: indicates the level of the building shown in the tile (Level = game level-1, so a level 1 school has a Level value of 0);
Status: indicates status of building (Status = B0 means built, B1 means built and damaged, B2 means built and seriously damaged, C0 means under construction);
NOTE: After Status you could find a r that means that this is a overlay tile that colours the tile with same name lacking of final r with the team color;
- "blackX.png" (X from 0 to 15);
- "brushX.png" (X from 0 to 9);
- "buildingsiteX.png" (X from 0 to 5);
- "bulletX.png" (X from 0 to 1);
- "deathXr.png" (X from 0 to 9);
- "explorationflag0r.png"
- "explosionX.png" 0-5
- "gameguiX.png" (X from 0 to 27);
- "magiceffect0.png" and "magiceffect0r.png"
- "miniBuilding_nameLevelStatus.png" with same notes you can see over;
- "ressourceX.png" (X from 0 to 64); (50-54: Cherry)
- "ressourceminiX.png" (X from 0 to 7); (0:Wood, 1: wheat, 5:cherry)
- "rotatingEarthX.png" (X from 0 to 19);
- "rotatingEarthi.png";
- "shadeX.png" (X from 0 to 20);
- "terrainX.png" (X from 0 to 271);
- "unitX.png" (X from 0 to 447) that are the "bodies" of the globs;
- "unitXr.png" (X from 64 to 447) that are the "shadows" of the globs;
- "unitminiXr.png" (X from 0 to 3);
- "wallX.png" (X from 0 to 15) show defensive wall;
- "wallXr.png" (X from 0 to 15) overlay team color over walls ;
- "wallc0.png" and "wallc0r.png";
- "warflag0r.png";
- "water0.png" and "water1.png"
Tiles HowTo
How to create tiles; blending near tile;
Software instruments
Good software for this purpose are Inkscape and the GIMP; but if you are not very good with vector painting, GIMP is simpler for having hi-quality tiles.
Tileset examples
Result of attempt of creating a vector-based tileset by Shew
Result number 2 of attempt of creating a vector-based tileset by Shew


